How To Create Columns In Powerpoint
There are times when you want to make the text within a text box flow into multiple columns in PowerPoint. At first, it may seem a bit difficult to do so. However, there is an easy way to add text columns in PowerPoint!
To add text columns in PowerPoint, select the text box first. Then, right-click and click on the "Format Shape" option. Then, click on the "Text Options" on the format shape panel. Next, under the "Text Box" settings, click on "Columns". Type the number of columns needed and click "OK".
In this article, we shall do a deep-dive on this topic and understand how we can add text columns in a text box in PowerPoint! Plus, we will also learn how to add and remove text columns from the text box!
So, let's get started!
1. How to Add Columns in Text Box in PowerPoint?
Microsoft PowerPoint has various text box features similar to other Microsoft software. In PowerPoint, you can add columns in a text box for ease of understanding as well as better visuals.
Here's what you need to do to add columns in a text box in PowerPoint –
Method 1 – Using the "Format Shape" option
There are actually two different ways you can add columns in a text box in PowerPoint. The first method is using the "Format Shape" options.
Step-1: Select the Text Box and Click on "Format Shape"
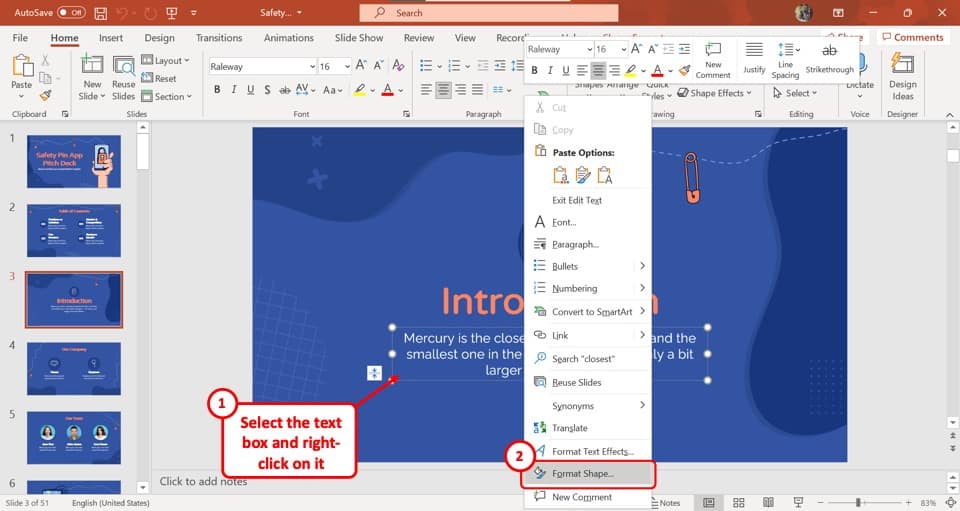
The first step is to "Right Click" on the text box. From the dropdown menu, click on the "Format Shape…" option to open the sidebar on the right side of your screen.
Step-2: Click on "Text Options"
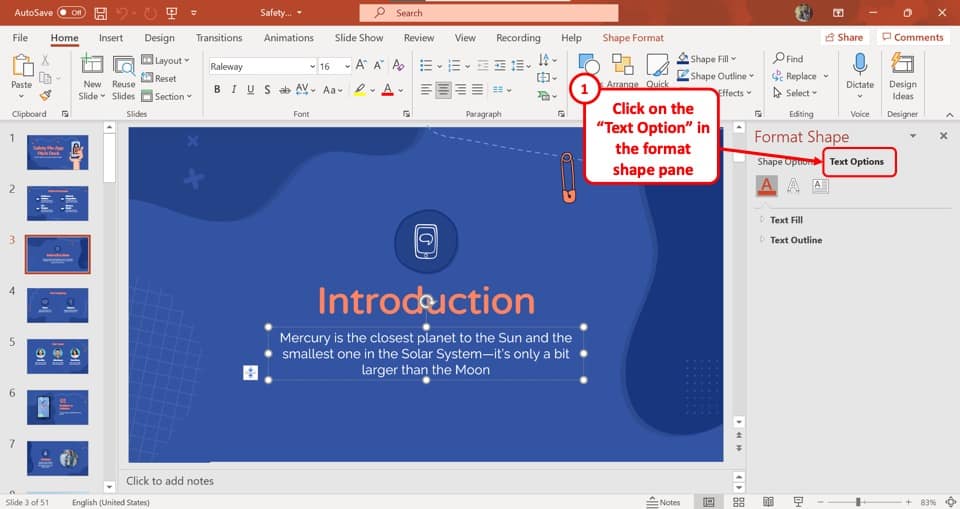
The next step is to click on the "Text Options" in the "Format Shape" sidebar. The "Text Options" is the second option at the top of the sidebar.
Step-3: Select the "Text Box" option
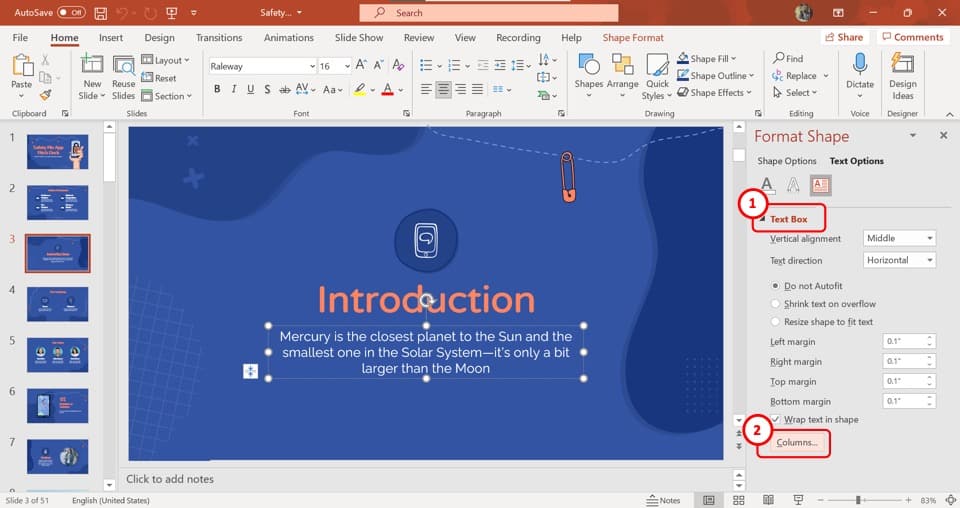
Now all you have to do is click on the "Text Box" option which is the third icon under the "Text Options".
Step-4: Click on the "Columns" button
In the "Text Box" options, click on the "Columns" button located at the bottom of the sidebar (as indicated in the image in step 3)
This will open a dialogue box in the middle of the screen.
Step-5: Type in the preferred number of columns
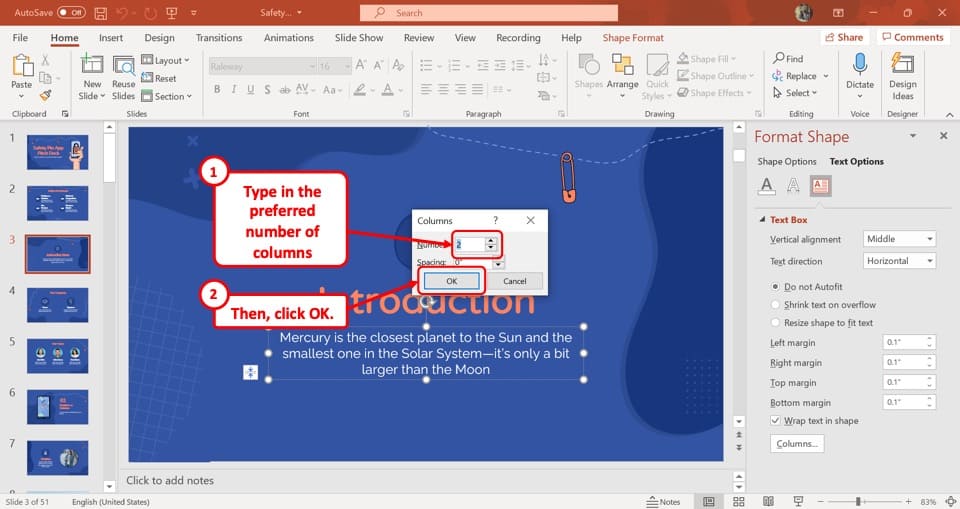
In the dialogue box, click on the "Number" box and type in the number of columns you would like to add in the text box.
Alternatively, you can repeatedly click the upward-facing arrow in the "Number" box to reach the preferred number of slides. Then click on the "OK" button to save it.
Method-2: Using the "Home" Tab
Another way to add text columns within a text box in PowerPoint is using the "Home" ribbon. Although this is a much faster method, but the only problem is identifying the icon to add columns on the home tab.
Neverthless, here's how you can add the columns in a text box using this method –
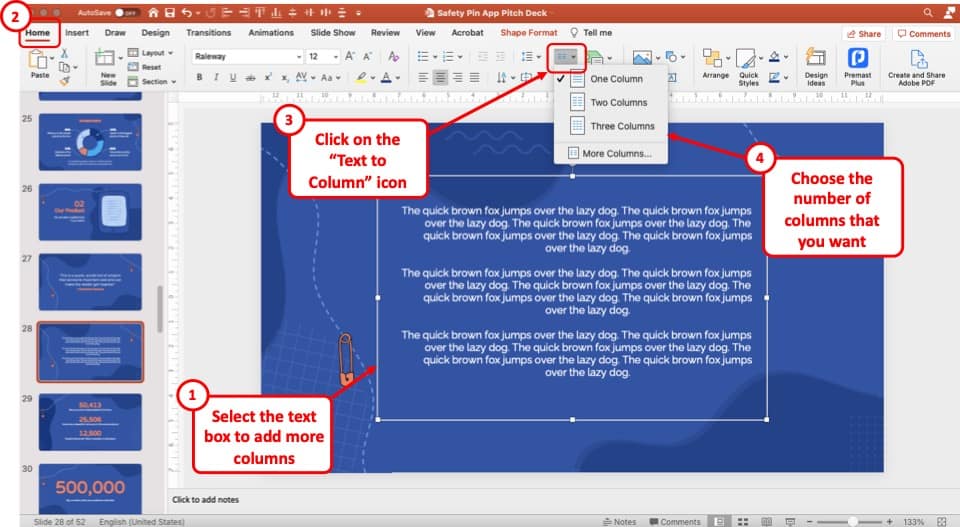
The first step is to select the text box where you want to add the columns.
Then, click on the "Home" ribbon. Next, locate the icon to add columns in a text box. It should be available under the "Paragraph" section on the home ribbon (as shown in the image above).
Then, click on the icon. You will be presented with a dropdown with a default option of adding one, two or three columns. Choose one based on your preference.
You can also add more columns if needed by click on the "More Columns" option and typing in the exact number of columns in the pop-up window that opens up next.
How to Add 3 Columns in PowerPoint Slide?
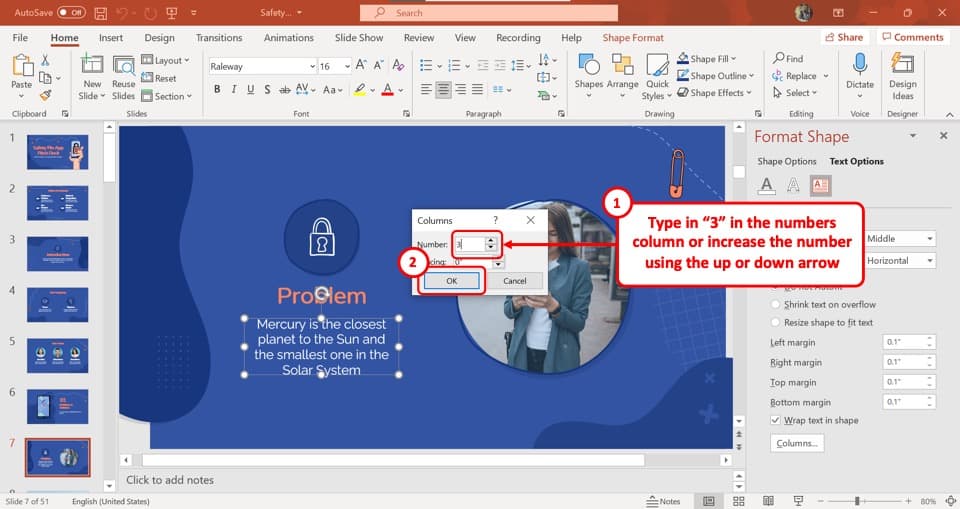
In Microsoft PowerPoint, the process of adding any number of columns in the text box is similar.
To add 3 columns in a slide, all you have to do is open the "Columns" dialogue box and type in "3" in the "Number" option. Then click on the "OK" button to create three columns.
2. How to Split a Column in PowerPoint?
Microsoft PowerPoint does not allow you to split a column within a text box. All columns are placed in a single text box.
However, you can also split the text in a text box in a column manually! To do that, you have to create multiple text boxes.
I wouldn't recommend using this method since this requires a lot of manual adjustments once the text is added. That said, if you really need to have a fixed text limit, here's how to do this –
Step-1: "Copy" the text box
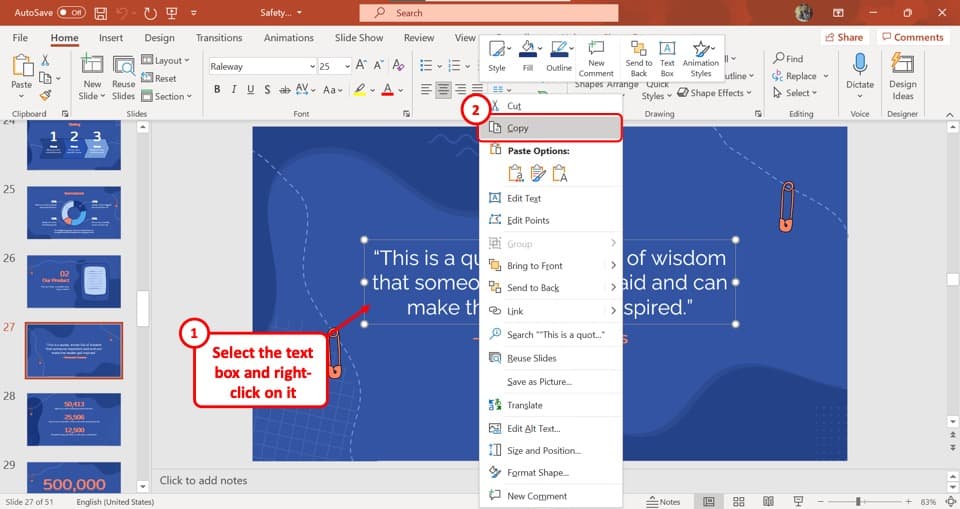
First, you have to click on the text box to select it. Then "Right Click" on the text box, and click on the "Copy" option from the dropdown menu.
Alternatively, you can press the "Ctrl+C" keys on your keyboard to copy the text box.
Note – Check out my other article to know more about Copy and Paste in PowerPoint!
Step-2: Click on the "Paste" option

Now click anywhere in the slide to deselect the textbox. "Right Click" again and select the "Use Destination Theme" under the "Paste" option.
Alternatively, you can press the "Ctrl+V" keys on your keyboard to paste the text box.
Step-3: Rearrange the text boxes
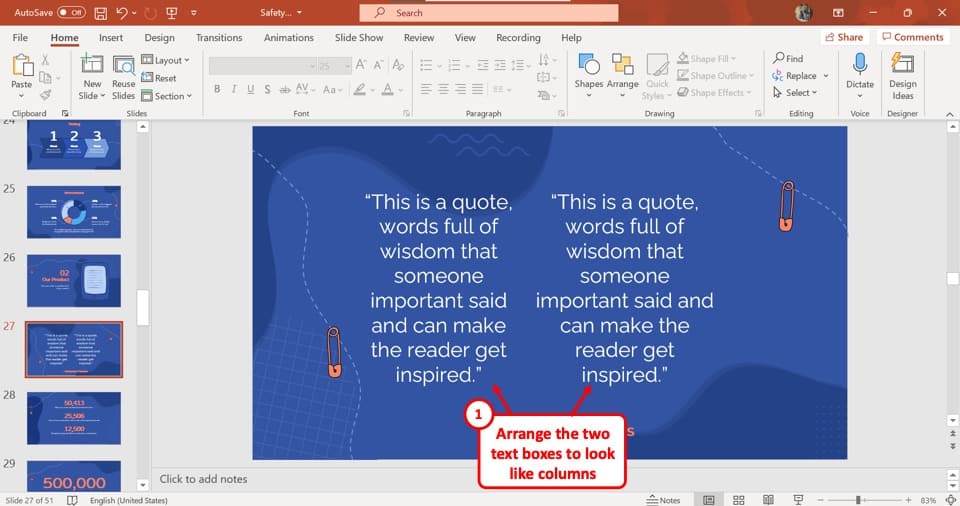
Now, all you have to do is resize and rearrange the text boxes. This will create two identical columns. You can now edit the texts inside each text box.
3. How to Increase Space Between Columns in PowerPoint?
In Microsoft PowerPoint, there are some very simple editing features for text columns. To increase the space between columns in PowerPoint, all you have to do is follow the 4 simple steps.
Step-1: Open the "Format Shape" menu
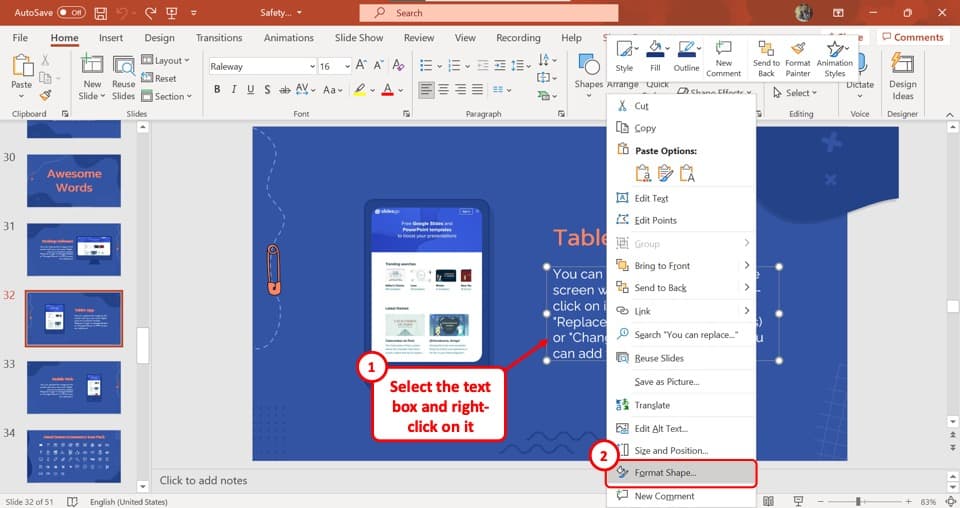
To open the "Format Shape" menu, you have to first "Right Click" on the text box and then select the "Format Shape…" option from the drop-down menu.
Step-2: Click on the "Text Box" option
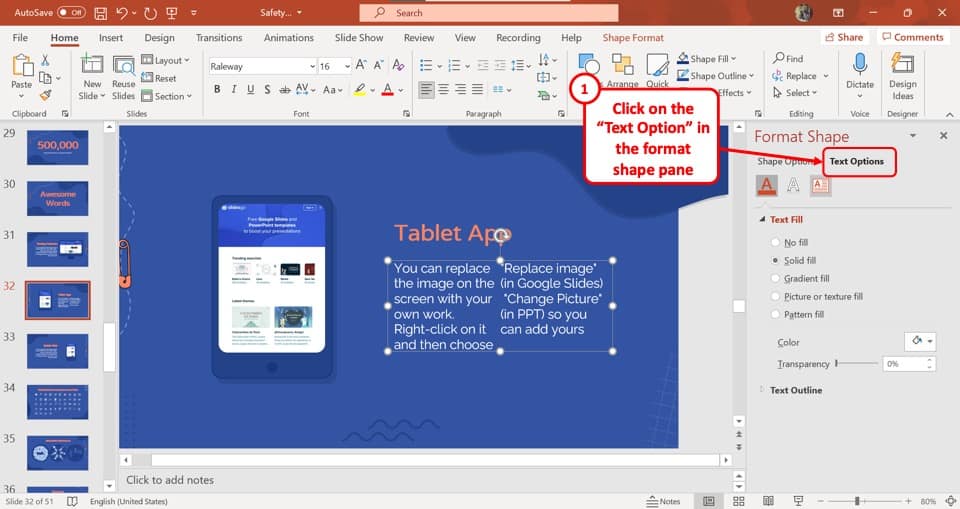
In the "Format Shape" menu located at the right side of the screen, click on the "Text Option" button. Then click on the "Text Box" icon which is the third icon under the "Text Option".
Step-3: Click on the "Columns" button
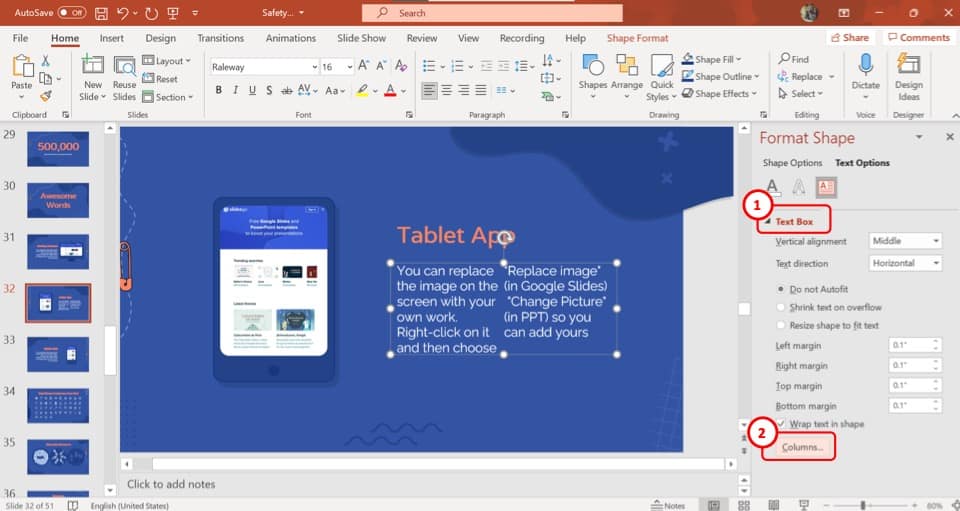
In the "Text Box" option, click on the "Columns…" button located at the bottom to open the "Columns" dialogue box.
Step-4: Click on the "Spacing" box
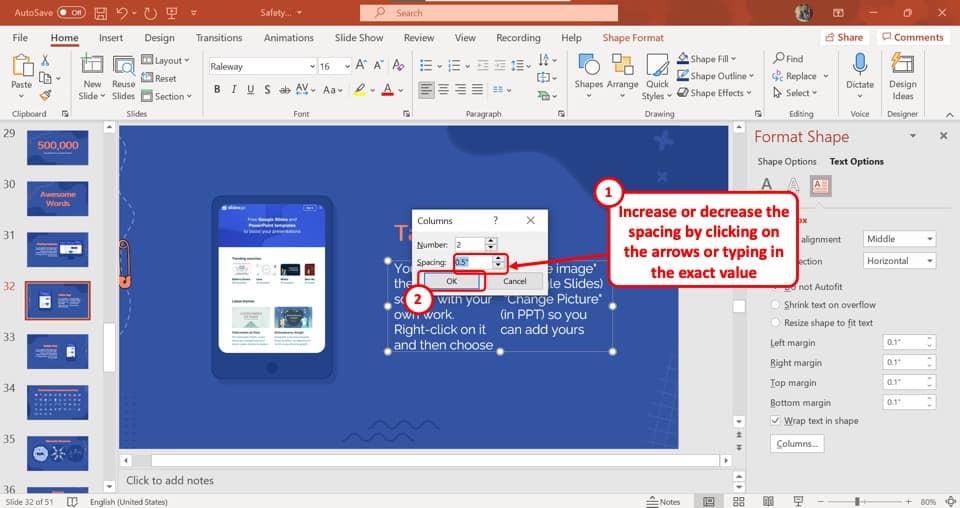
Click on the "Spacing" box in the dialogue box and type in your preferred spacing number.
Alternatively, you can click on the upward or downward-facing arrows to increase or decrease the amount of spacing respectively. Click on the "OK" button to save your preferred spacing.
4. How to Insert a Column Break in PowerPoint?
Microsoft PowerPoint does not have the feature to allow column breaks. However, you can create a column break manually inside a text box.
To do so, at first you have to click on the text box where you want to insert the column break. Then, all you have to do is repeatedly press the "Enter" key on your keyboard until the column break is created.
5. How to Add Two Columns of Bullets in PowerPoint?
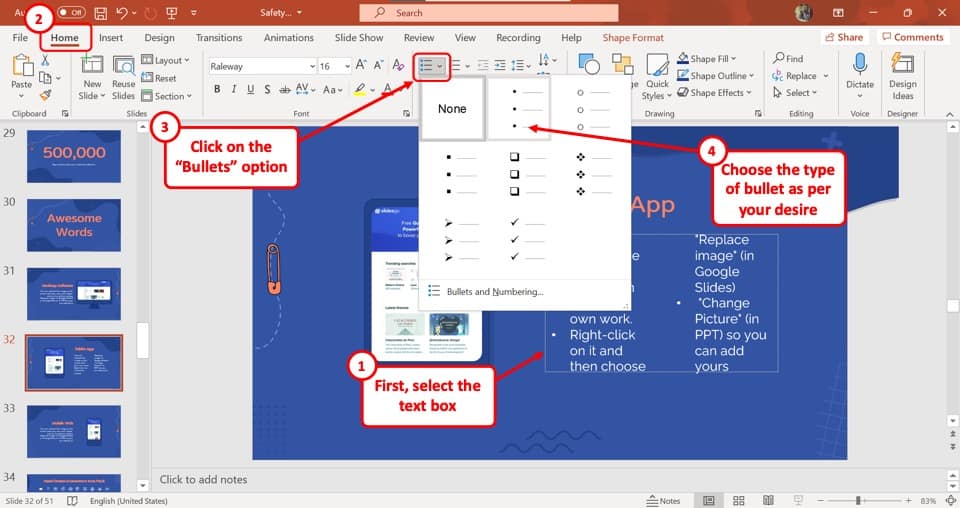
Microsoft PowerPoint has very limited features for text columns. So the process of adding two columns of bullets in PowerPoint is identical to the process of adding columns in the text box.
All you have to do is first add the bullets points. If you are unsure how to do that, check out my other article on how to add bullet points in PowerPoint.
But, here's a shorter version of what you need to do. Select the text box and click on the "Bullets" icon from the toolbar located at the top of the screen under the menu bar.
Then follow the steps for adding columns in the text box mentioned earlier in the article.
6. How to Remove Columns in PowerPoint?
Microsoft PowerPoint allows you to remove columns from the text box in a similar manner as adding columns. All you have to do is follow the 5 easy steps.
Step-1: Select the "Format Shape…" option
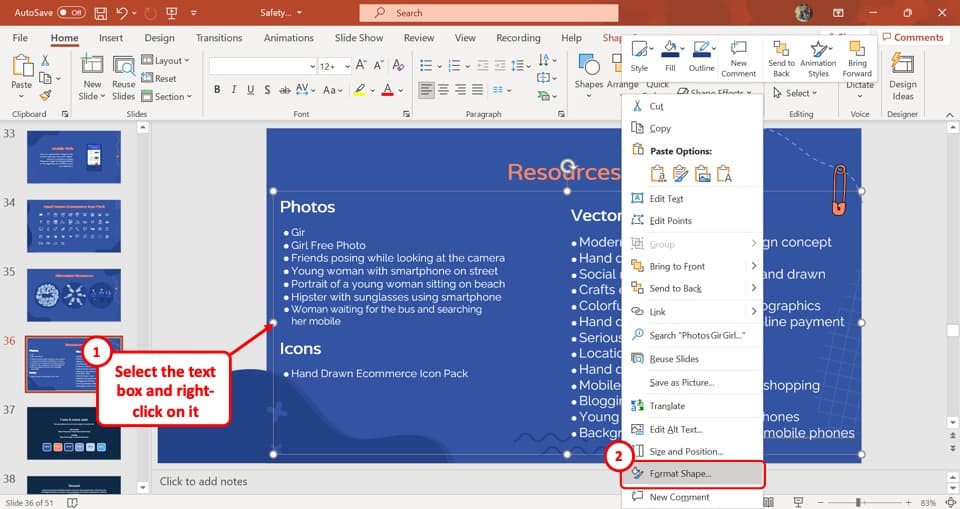
The first step is to open the "Format Shape" menu. To do so, "Right Click" on the text box to open a dropdown menu and select the "Format Shape…" option.
This will open the "Format Shape" menu on the right side of your screen.
Step-2: Click on "Text Options"
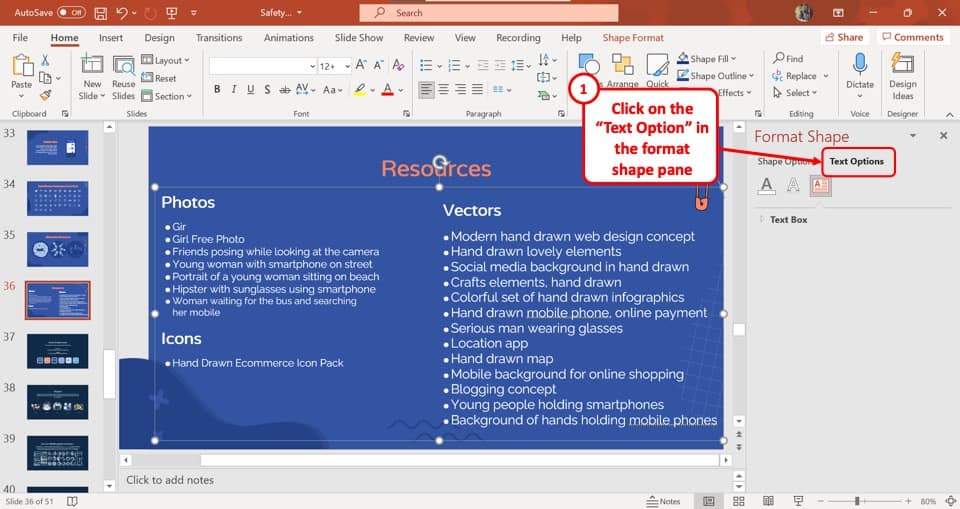
In the "Format Shape" menu, click on the "Text Options" button located at the top of the sidebar. This will open a secondary menu with three icons.
Step-3: Click on the "Text Box" icon
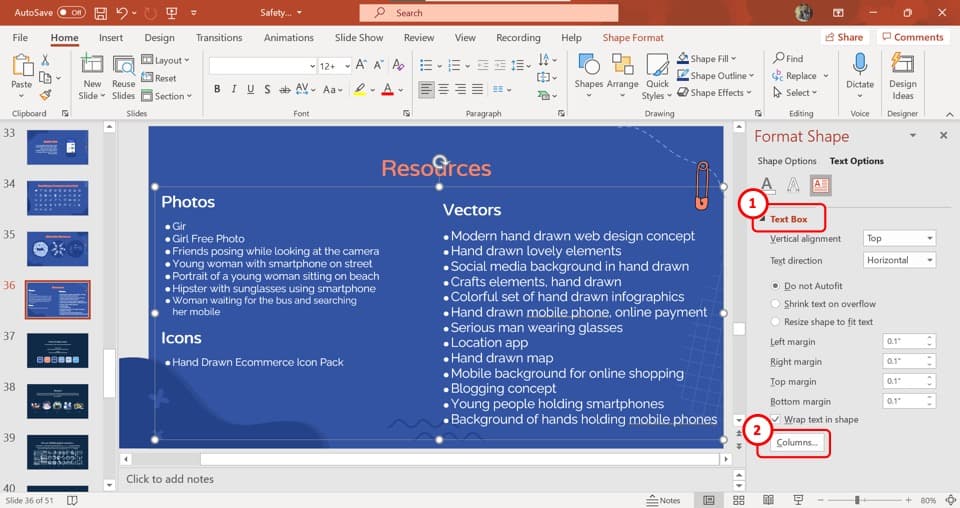
Now, you have to click on the "Text Box" icon which is the third and last icon under the "Text Options". Then click on the "Columns…" button located at the bottom of the "Format Shape" sidebar.
Step-4: Type in "1" in the "Number" box
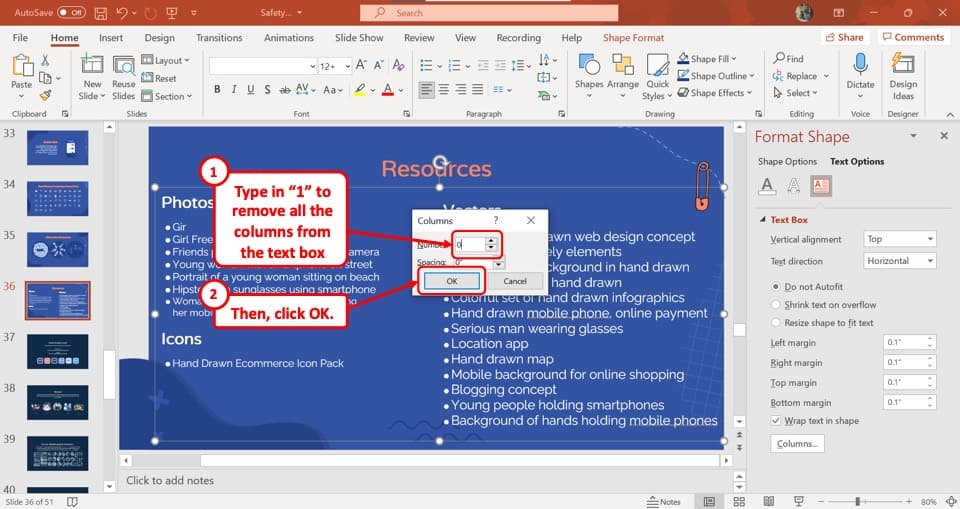
In the "Columns" dialogue box, click on the "Number" box. All you have to do now is type in "1".
Alternatively, you can repetitively click on the downward-facing arrow in the "Number" box until the number of columns goes down to 1. Then click on the "OK" button to remove the columns.
Credit to drobotdean (on Freepik) for the featured image of this article (further edited)
How To Create Columns In Powerpoint
Source: https://artofpresentations.com/add-text-columns-in-powerpoint/
Posted by: linseymarban.blogspot.com

0 Response to "How To Create Columns In Powerpoint"
Post a Comment